18 9月 2009
碎碎唸(8)
16 9月 2009
Nexus : Maven Repository Server
- Download nexus-webapp-XXX.war
- Nexus的下載頁面在 http://nexus.sonatype.org/downloads/ ,雖然Nexus也有自帶jetty的版本,但我還是打算使用webapp來安裝,所以下載的是nexus-webapp-XXX.war。
- Deploy nexus-webapp-XXX.war
- 將war改名為nexus.war後直接丟到${tomcat}/webapp下就好。
- 設定sonatype-work權限 (各OS與distribution㑹有所不同)
- 由於nexus需要實體目錄存放下載的檔案,所以㑹在/usr/share/tomcat6下建一個sonatype-work的目錄,但由於/usr/share/tomcat6的權限原屬於root,所以執行
$> sudo mkdir /usr/share/tomcat6/sonatype-work
$> sudo chown tomcat6:tomcat6 /usr/share/tomcat6/sonatype-work
後再重起tomcat即可
- 由於nexus需要實體目錄存放下載的檔案,所以㑹在/usr/share/tomcat6下建一個sonatype-work的目錄,但由於/usr/share/tomcat6的權限原屬於root,所以執行
- 再來是設定client端maven2用的setting.xml
- 加入下面的xml到setting.xml,將其中tomcat_ip與tomcat_port改成你實際使用的
<mirrors>
    <mirror>
        <id>nexus</id>
        <mirrorOf>*</mirrorOf>
        <url>http://${tomcat_ip}:${tomcat_port}/nexus/content/groups/public</url>
    </mirror>
  </mirrors>
  <profiles>
    <profile>
    <id>nexus</id>
    <repositories>
        <repository>
            <id>central</id>
            <url>http://central</url>
            <releases><enabled>true</enabled></releases>
            <snapshots><enabled>true</enabled></snapshots>
        </repository>
    </repositories>
    <pluginRepositories>
        <pluginRepository>
            <id>central</id>
            <url>http://central</url>
            <releases><enabled>true</enabled></releases>
            <snapshots><enabled>true</enabled></snapshots>
        </pluginRepository>
    </pluginRepositories>
    </profile>
  </profiles>
  <activeProfiles>
    <activeProfile>nexus</activeProfile>
  </activeProfiles>
這樣就有一個Maven Repository Server 可用了! PS:Mac上的maven在mirror中如果用hostname對應ip似乎不正常,在/etc/hosts已經設好了,但是就是連不到,用curl與wget都沒問題…
04 9月 2009
Ubuntu & git-daemon
sudo apt-get insall git-daemon-run安裝好了之後改一下 /etc/sv/git-daemon/run, 將"--base-path=xxxx"指到你git repositories 的root path, 然後在每一個你要share出來的git repository中下一個指令建立magic file
touch git-daemon-export-ok沒有git-daemon-export-ok這檔案的repository是不會被別人看到的.
再重起git-daemon即可囉
sudo /etc/init.d/git-daemon restart
02 9月 2009
Maven2: Profile
通常在一個專案中,執行的環境通常不㑹只有一個,大多數的情形是3個,真正上線的Production環境,上線前的測試Staging環境,還有就是開發人員自己開發時用的Personal環境,所以在Package時自然應該要有不同的Script來處理不同環境下的設定檔,不然用人工的話很容易發生開發人員將Personal的設定檔包入Production要用的deployment file。Server起不來就算了,就怕滙入了什麼不該滙的,或是砍了什麼不能砍的…
早期使用Ant時,properties跟xml不是用merge就是用replace的,Maven的做法也不例外,只是Ant要寫不少個ant task,但Maven不用,當然,過於思念或割捨不下Ant時,仍然可以透過Ant run在Maven中讓你與Ant相逢。
下面舉個小小的例子,使用profile來區分不同的環境下使用的同名設定檔。
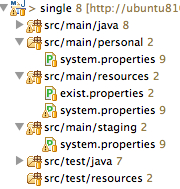
Project的Resources Structure如圖
src/main/resources為production環境使用的設定檔,這個目錄也是Maven2預設的resources目錄
src/main/staging為上線前的staging璄環使用,
src/main/personal為開發人員本身所用的設定檔。
3個目錄中皆有一個同名的properties檔案:system.properties,其中內容有所不同
resources/system.properties
profile=productionstaging/system.properties
profile=stagingpersonal/system.properties
profile=personal而resources再多一個共用的設定檔exist.properties,用以確認在production之外的環境下除同名檔案被覆蓋外,其餘檔案仍正常存在,內容如下
exist=true再寫一個簡易的JUnit Test Case
@RunWith(BlockJUnit4ClassRunner.class)
public class SampleTest {
   private ResourceBundle systemRb = null;
   private ResourceBundle existRb = null;
   @Before
   public void befor() {
       systemRb = ResourceBundle.getBundle("system");
       existRb = ResourceBundle.getBundle("exist");
   }

   @Test
   public void testResources() {
       System.out.println("profile for : "+this.systemRb.getString("profile"));
       System.out.println("check exist : " +this.existRb.getString("exist"));
   }
}
簡單地讀取system.properties及exist.properties,然後將profile及exist的值列出來而已。再來看pom.xml
               src/main/resources


           staging


                       src/main/staging
                       true


           personal


                       src/main/personal
                       true
在profiles下定了staging及personal兩個profile,其中要注意的是<filtering>這個tag,雖說Maven是用這個值做為判斷是否要使用merge的依據,但設為true後㑹強制覆蓋同名檔案,這才是我希望的功能。
接下來只要在maven執行時加入-P<profile_id_1>即可,所以試著執行下列command看看結果
$> mvn clean test
-------------------------------------------------------
profile for : production
check exist : true
$> mvn -Pstaging clean test
-------------------------------------------------------
profile for : staging
check exist : true
$> mvn -Ppersonal clean test
-------------------------------------------------------
profile for : personal
check exist : true
三個結果很明顯地因為-P所帶的參數而有不同的結果
其他必需注意的,-P後面可以帶多個profile id,只要用逗號分隔即可,而profile除了區分resource外,還可以指定JDK版本,或是設定properties等作用,例如可以加上<maven.test.skip>true</maven.test.skip>來免除執行test。