23 4月 2010

JPA2--Transaction Management

Transaction Type:

(1) Resource-local Transaction:Persistence Unit使用native JDBC driver。
(2) JTA Transaction:僅能在JEE Server中使用,可以管理distributed XA Transaction。

CMEM一定使用JTA Transaction,而在JEE Container 中的AMEM則可在兩者中擇一使用,不在JEE Container 中的AMEM僅能使用Resource-local Transaction。

Transaction 與 Persistence Context間的關係:
Synchronization: Persistence Context與Transaction註冊,當Transaction committed 時會通知該Persistence Context,而Persistence Context在收到通知時就應該執行flush將Entity Instances輸出到DB。
Association:Persistence Context與Transaction註冊的動作就是Association,也可以說是在Transaction的scope中啟動Persistence Context。
Propagation:在多個CMEM中的Transaction中共用Persistence Context

與CMEM可以區分為Transaction-Scoped(TRANSACTION)與Extended(EXTENDED)一樣,CMEM可用到的Persistence Context也分為兩類。
Transaction-Scoped Persistence Context:
由CMEM負責,在必要的時候建立TransactionScoped Persistence Context。也就是在CMEM中任意method被呼叫去再確認是否需要。簡單是說,CMEM被動地為每一個Transaction建立一個persistence context,建立的时間點是在CMEM有任意method被呼叫時。

Extended Persistence Context:
基本上由Container負責,當Stateful Session Bean被create時產生,在Stateful Session Bean被removed時結束。與其他Transaction-Scoped的CMEM也能共享此Persistence Context。

而AMEM就可以使用Application-Managed Persistence Contexts。
Application-Managed Persistence Contexts與CMEM使用的Persistence Context最大的差別,在同一個Transaction中,可以存在多個Persistence Contexts。由AMEM自行建立的Transaction可與其他CMEM共享,但如果是要加入其他已建立的Transaction則以joinTransaction()處理。
由於AMEM無法處理Transaction Propagation,所以要共用Persistence Context唯一的辦法就是使用同一個EntityManager instance。而AMEM控制Transaction則是使用EntityTransaction Interface,利用EntityManager.getTransaction()來取得EntityTransaction,再用.begin()、.commit()來控制Transaction。

請記得EntityManager、Persistence Context、Transaction間的差別。


21 4月 2010

JPA2--Entity Manager (1)

Entity Manager 藉由Persistence Context來控制被管理的Entity Instances,而每個Persistence Context必定由一個Persistence Unit來限制該Context可以管理的Entity Classes種類。

Entity Manager 可以分為兩類

  • Container-Managed Entity Manager
  • Application-Managed Entity Manager
Container-Managed Entity Manager(以下簡稱CMEM)就如同字意上所代表的,是由JEE Container所管理的Entity Manager,主要是以@PersistenceContext標識在你的程式中,Container會在執行期間自動注入對應的instance。CMEM還可以再區分兩類:PersistenceContextType.TRANSACTION (Default)及 PersistenceContextType.EXTENDED

TRANSACTION:主要是配合Stateless Session Bean與JTA Transaction,在每次CMEM的method被呼叫時都去檢查JTA transaction中是不是有Persistence Context,如果有就續用否則就建一個新的。當JTA Transaction commit 時,在persistence context中的entity instances就會自動persist至DB。

EXTENDED:主要是配合Stateful Session Bean,只有當執行到有@Remove標識的method時才會persist 在persistence context中的entity instances。

Application-Managed Entity Manager(以下簡稱AMEM)也很清楚,就是由Application自行管理,藉由呼叫EntityManagerFactory.createEntityManager()來取得AMEM,也因為如此,一般的J2SE程式也可以使用,當然在JEE Container也可以使用,特別是在某些特別情況或有特殊考慮時多一種方式可以應用。如果要在JEE Container中使用的話,與CMEM不同之處是以@PersistenceUnit來標識要被注入的EntityManagerFactory,而且也必需呼叫EntityManager.close()來指出要persist的時機。AMEM產生persistence context的時機也與CMEM有所不同,當呼叫EntityManagerFactory.createEntityManager()就會產生一個persistence context。

不過Transaction並不是只有這麼簡單....


13 4月 2010

JPA(2)--Relationship

  • 跟原先Hibernate設定一樣,想清楚Directionality、Cardinality及Ordinality
  • 只要能分辦
    @OneToOne
    @OneToMany
    @ManyToOne
    @ManyToMany
    差在哪就好.....
  • 區別Owning side及Inverse Side
    Owning Side:記錄Relationship那一方,記有@JoinColumn
    Inverse Side:未記有@JoinColumn,在Bidirectional relationship時需加上mappedBy=XXX
  • 基本上
    @ManyToOne的幾乎都是Owning Side
    @OneToMany的幾乎都是Inverse Side
    @ManyToMany較為特別,因為在Bidirectional情況下,雙方都可能是Owning Side,但仍需決定哪一方為Owning Side,也就是在Inverse Side那一方加上mappedBy=XXX。
  • @ManyToMany時使用@JoinTable取代@JoinColumn
  • @OneToMany如果要做Unidirectional relationship的話,也請用@JoinTable
  • One to one的情形也可以考慮@Embeddable,不過這情形通常是因為舊有程式有一個很大的Table,不希望一次載入時使用。

12 4月 2010

JPA2(1)--Basic Annotation

  • @Entity
    當Class被標識為@Entity,代表這個Class可以被persist至DB,而該Class中的Field除特別以@Transient標記外皆預定會被儲存。
  • @Id
    每個Entity都需要ID做為識別的基準,產生ID的方式由@GeneratedValue來決定
    @GeneratedValue
    strategy => GenerationType:AUTO, TABLE, SEQUENCE, IDENTITY
    GenerationType.AUTO 雖然方便,但建議僅供開發或Prototyping使用
    GenerationType.TABLE 再利用@TableGenerator來指定記錄key的Table相關資料
    GenerationType.SEQUENCE 部份DB支援Sequence, 利用DB的Sequence功能,也可以使用@SequenceGenerator來指定Sequence相關資料.
    GenerationType.IDENTITY 部份DB支援identity column,這方式有個缺點,就是ID一定要在Insert之後才能確認。
  • @Access
    指出JPA存取Field的方式
    AccessType.FIELD: 利用refection存取Field,無視getter跟setter,但是field的visibility不得定為public。例如:@Id private int id;
    AccessType.PROPERTY: 利用getter跟setter來存取field,但getter/setter的visibility一定要定為public或protected。例如:@public int getId() { return id; }
  • @Transient
    表示該field不會被persist
  • @Table
    提供Table name及所屬schema或catalog name
  • @Column
    指定所存的Column Name
  • @Enumerated
    記錄enum所用,ORDINAL用數字而STRING則以文字記錄該property.
    EnumType.ORDINAL, EnumType.STRING
  • @Temporal
    記錄時間用如java.util.Date、java.util.Calendar所用,如果是javax.sql.Date之類的就不用多費心了。
    DATE, TIME, TIMESTAMP
  • @Basic
    可以指定Fetch的方式,利用FetchType.LAZY可減少不必要的Query
    FetchType.LAZY FetchType.EAGER
  • @Lob
    CLOB char[] or BLOB byte[]

StrutsSpringTestCase

Struts2的Unit Test說容易也是真的不麻煩,但如果希望測試得仔細些又要頗費力氣,還好在2.1.8時將一直沒有Commit到release repository的StrutsSpringTestCase放了出來,使Unit Test又更加方便。 下列寫個簡單例子:

public class FirstActionTest extends StrutsSpringTestCase{
	 public void testAction() throws Exception {  
		  ActionProxy actionProxy  = this.getActionProxy ( "first!index.action");  
		  Assert.assertNotNull(actionProxy);  
		  FirstAction action = (FirstAction) actionProxy.getAction();  
		  Assert.assertNotNull(action);  

		 String result = actionProxy.execute();  
		  Assert.assertEquals(FirstAction.SUCCESS , result);  
	 }  
} 
ActionProxy actionProxy  =  this.getActionProxy("first!index.action");
FirstAction action = (FirstAction) actionProxy.getAction();
String result = actionProxy.execute();
this.getActionProxy()內帶入你實際在跑的uri,取得Action後再設定你要測的property,最後再run actionProxy.execute();就可以做成一個簡單的測試,如果需要改變Spring configuration xml的位置,請override protected String getContextLocations(); 另外有兩點要注意,如果你使用wildcard如first_*來控制action的execution methed,請在測試時用!來分隔wildcard,trace了一段時間,還沒找出問題在哪...另一個是actionProxy.execute()會有找不到jsp的實際檔案的情形,但不影響測試,這部份應該是放到integration test就能解決。


Spring3與JPA2 (1)

ORM的選擇很多,雖然JEE訂出了一個規格JPA,但之前並不喜歡使用,主要是因為相較其他原生的library像Hibernate, Eclipse Link等,JPA在實際開發上並不如其他Library來得方便,沒有像Hibernate的Criteria這類API就令我很感冒,所以在ORM的Demo裡一直沒有把JPA納入,多半使用的都還是Hibernate。
直到JPA2規格訂完,Hibernate也出了Stable的版本,想想也該納入看一看了。Hibernate與JPA所訂的EntityManager差異還不小,從中轉換還是要看一下JPA2的Spec,但我發現花較多時間的是在Spring的Configuration,要設定的部份較原來的純Hibernate要多出不少,而且有些我看了還是有些疑惑,看來單單有關Configuration就要寫上幾篇筆記了。
下列是基本的Spring Configurations:
applicationContext.xml:

<? xml   version= "1.0"   encoding= "UTF-8" ?>
< beans   xmlns = "http://www.springframework.org/schema/beans" 
   xmlns:xsi = "http://www.w3.org/2001/XMLSchema-instance"  xmlns:context = "http://www.springframework.org/schema/context" 
   xmlns:util = "http://www.springframework.org/schema/util"  xmlns:p = "http://www.springframework.org/schema/p" 
   xmlns:tx = "http://www.springframework.org/schema/tx"  xmlns:aop = "http://www.springframework.org/schema/aop" 
   xsi:schemaLocation = "http://www.springframework.org/schema/beans http://www.springframework.org/schema/beans/spring-beans.xsd   
       http://www.springframework.org/schema/context http://www.springframework.org/schema/context/spring-context.xsd 
       http://www.springframework.org/schema/tx   http://www.springframework.org/schema/tx/spring-tx.xsd 
       http://www.springframework.org/schema/aop   http://www.springframework.org/schema/aop/spring-aop.xsd 
       http://www.springframework.org/schema/util http://www.springframework.org/schema/util/spring-util.xsd ">  
  
   < context:property-placeholder   location = "classpath:system.properties"  />  
  
   < bean   id = "dataSource"  class = "com.mchange.v2.c3p0.ComboPooledDataSource">  
    < property   name = "driverClass"  value = "${jdbc.driverClass}"  />  
    < property   name = "jdbcUrl"  value = "${jdbc.url}"  />  
    < property   name = "user"  value = "${jdbc.user}"  />  
    < property   name = "password"  value = "${jdbc.password}"  />  
    < property   name = "autoCommitOnClose"  value = "${jdbc.autoCommitOnClose}"  />  
   </ bean>  
   
   < bean   id = "entityManagerFactory" 
    class = "org.springframework.orm.jpa.LocalContainerEntityManagerFactoryBean">  
    < property   name = "persistenceXmlLocation"  value = "org/elliot/dao/jpaimpl/persistence.xml"  />  
    < property   name = "dataSource"  ref = "dataSource"  />  
    < property   name = "jpaVendorAdapter">  
     < bean   class = "org.springframework.orm.jpa.vendor.HibernateJpaVendorAdapter">  
      < property   name = "database"  value = "${hibernate.database}"  />  
      < property   name = "showSql"  value = "${hibernate.show_sql}"  />  
      < property   name = "generateDdl"  value = "${hibernate.generate_ddl}"  />  
     </ bean>  
    </ property>  
    < property   name = "jpaPropertyMap">  
     < props>  
     < prop   key ="hibernate.cache.provider_class" > org.hibernate.cache.HashtableCacheProvider</ prop >  
     </ props>  
    </ property>  
   </ bean>  
  
   < bean   id = "entityManager" 
    class = "org.springframework.orm.jpa.support.SharedEntityManagerBean">  
    < property   name = "entityManagerFactory"  ref = "entityManagerFactory"  />  
   </ bean>  
  
   < bean   id = "transactionManager"  class = "org.springframework.orm.jpa.JpaTransactionManager">  
    < property   name = "entityManagerFactory"  ref = "entityManagerFactory"  />  
    < property   name = "dataSource"  ref = "dataSource"  />  
   </ bean>  
  
   < tx:annotation-driven  transaction-manager = "transactionManager"  
    proxy-target-class= "true"   />  
  
   < context:annotation-config  />  
   < context:component-scan   base-package = "org.elliot.dao.jpaimpl,org.elliot.service"  />  
  
</ beans> 

persistence.xml

< persistence   xmlns = "http://java.sun.com/xml/ns/persistence"
   xmlns:xsi = "http://www.w3.org/2001/XMLSchema-instance" 
   xsi:schemaLocation = "http://java.sun.com/xml/ns/persistence http://java.sun.com/xml/ns/persistence/persistence_2_0.xsd" 
   version= "2.0" >  
   
   < persistence-unit   name = "Master"  transaction-type = "RESOURCE_LOCAL">  
   < class > org.elliot.domain.Master</ class >  
    < exclude-unlisted-classes/>  
   </ persistence-unit>  
  
</ persistence>

system.properties:

#h2database configurations
jdbc.driverClass= org.h2.Driver  
jdbc.url = jdbc:h2:~/test 
#jdbc.url=jdbc:h2:tcp://localhost/~/test 
jdbc.user= sa  
jdbc.password=  
jdbc.autoCommitOnClose= true  
  
hibernate.database= H2  
hibernate.dialect = org.hibernate.dialect.H2Dialect 
hibernate.show_sql= true  
hibernate.format_sql= true  
hibernate.generate_statistics= true  
hibernate.hbm2ddl.auto= create  
hibernate.cache.use_second_level_cache= true  
hibernate.generate_ddl= true

其中要注意的是Spring: entityManagerFactory的persistenceXmlLocation,基本上應是要指到META-INF下,這裡只是方便測試才搬出來,如果希望在其他不用Spring的案子使用要記得放回去,至於其他Spring還有許多相關的Configuration如loadTimeWeaver之類的就還在研究了。。。

08 4月 2010

m2eclipse與Jetty 7

Jetty是一個小巧又能高度客製化的Servlet Container,在很多場合可能會比Tomcat要來得方便,但是在配合Eclipse開發時有點缺憾,就是Jetty配合可用的Server Adapter更新不快,Jetty7至今仍未有一個方便的Server Adapter可以像使用Tomcat一樣快速Deploy,不過利用m2eclipse也可以減少利用Jetty7開發時的不便。
第一步:當然是要會裝m2eclipse....
第二步:修改pom.xml,加入maven-jetty-plugin
<plugin>
 <groupId>org.mortbay.jetty</groupId>
 <artifactId>jetty-maven-plugin</artifactId>
 <version>7.0.2.v20100331</version>
 <configuration>
 <scanIntervalSeconds>10</scanIntervalSeconds>
 <webAppConfig>
 <contextPath>/sample</contextPath>
 </webAppConfig>
 <stopPort>9966</stopPort>
 <stopKey>stop</stopKey>
 </configuration>
</plugin>
其中<contextPath>就是你想訂的web context名稱,如果不加會變成root context而不是依你web.xml中所訂的<display-name>。而<stopKey>跟<stopPort>也請務必要加,否則jetty:stop會無法正常使用。
第三步:在Eclipse加上Run/Debug Configurations,
(1)Jetty Run:
在"Main" Tab中
Base directory中輸入${project_loc}
Goals輸入jetty:run
(2)Jetty Stop:
在"Main" Tab中
Base directory中輸入${project_loc}
Goals輸入jetty:stop
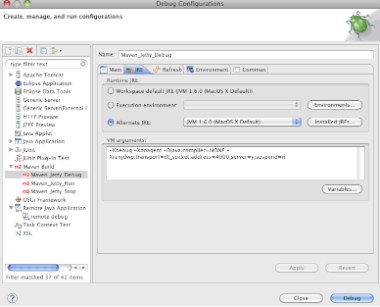
(3)Jetty Debug:
先同於Jetty Run一樣
在"Main" Tab中
Base directory中輸入${project_loc}
Goals輸入jetty:run
然後在"JRE" Tab中
VM arguments:輸入
-Xdebug -Xnoagent -Djava.compiler=NONE -Xrunjdwp:transport=dt_socket,address=4000,server=y,suspend=n
其中address=4000,4000是指Remote debug所用的port,只要不被其他Server佔用就好。

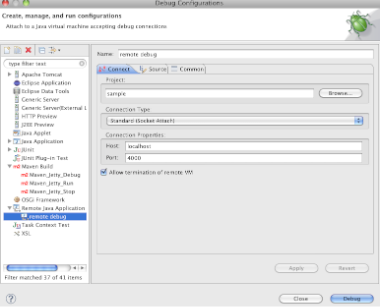
(4)Remote Debug
加入一個Remote Java Application的設定
在這project就必需指定,不能用變數,主要是為了確認Java Source Code與Remote Application的對應,再來host填localhost,當然不一定要是localhost,也可以是其他IP,但是上列的情形來看一定是localhost,Port則是要同於上列(3)所指定的Port。
這樣一來,除了可以不離開Eclipse而啟動關閉Jetty外,也可以利用Remote Debug來做Debug的操作,雖然不能同於Server Adapter一樣方便,但只要會這方法,之後遇到其他Server也不用擔心。
ps;m2eclipse 0.10在設定Maven Build時有點問題,當你要輸入Base directory時請確認你的滑鼠是點在 Package Explorer中的某一個Project名稱而不是Project下某一檔案,否則會警告Base directory設定有誤。

套用Maven2在Eclipse上的Dynamic Web Project

這問題在最近一個月被問了三次,雖然沒什麼價值,想想還是寫出來好了。
不少朋友用Eclipse開了個Dynamic Web Project後再想加入Maven2作為Build Tool,但是由於兩者間的目錄結構不同而頗為困擾,這種情形下我比較建議修改pom.xml以符合現行Project的結構。

<build>
    <sourcedirectory>${basedir}/src</sourcedirectory>  
    <outputdirectory>${basedir}/build/classes</outputdirectory>  
    <resources>  
     <resource>  
     <directory>${basedir}/src</directory>  
      <includes>  
       <include>*.xml</include>  
      <include>*.properties</include>  
      </includes>  
      <excludes>  
       <exclude>**/.svn/</exclude>  
      </excludes>  
     </resource>  
    </resources>  
    <plugins>  
     <plugin>  
     <groupid> org.apache.maven.plugins</groupid>  
     <artifactid> maven-compiler-plugin</artifactid>  
      <version>2.1</version>  
      <inherited>true</inherited>  
      <configuration>  
       <source>1.6</source>  
       <target>1.6</target>  
      </configuration>  
     </plugin>  
     <plugin>  
     <groupid> org.apache.maven.plugins</groupid>  
     <artifactid>maven-war-plugin</artifactid>  
     <version>2.1-beta-1</version>  
      <inherited>true</inherited>  
      <configuration>  
       <webappdirectory>${basedir}/WebContent</webappdirectory>  
       <packagingexcludes>**/.svn/</packagingexcludes>  
      </configuration>  
     </plugin>  
    </plugins>  
   </build> 
主要是<sourcedirectory>、<resources>跟maven-war-plugin中的<webappdirectory>
<packagingexcludes>加入**/.svn/則視情形而定,如果覺得.svn被包進war沒差也就沒關係了。