Jetty是一個小巧又能高度客製化的Servlet Container,在很多場合可能會比Tomcat要來得方便,但是在配合Eclipse開發時有點缺憾,就是Jetty配合可用的Server Adapter更新不快,Jetty7至今仍未有一個方便的Server Adapter可以像使用Tomcat一樣快速Deploy,不過利用m2eclipse也可以減少利用Jetty7開發時的不便。
第一步:當然是要會裝m2eclipse....
第二步:修改pom.xml,加入maven-jetty-plugin
第一步:當然是要會裝m2eclipse....
第二步:修改pom.xml,加入maven-jetty-plugin
<plugin>
 <groupId>org.mortbay.jetty</groupId>
 <artifactId>jetty-maven-plugin</artifactId>
 <version>7.0.2.v20100331</version>
 <configuration>
 <scanIntervalSeconds>10</scanIntervalSeconds>
 <webAppConfig>
 <contextPath>/sample</contextPath>
 </webAppConfig>
 <stopPort>9966</stopPort>
 <stopKey>stop</stopKey>
 </configuration>
</plugin>
其中<contextPath>就是你想訂的web context名稱,如果不加會變成root context而不是依你web.xml中所訂的<display-name>。而<stopKey>跟<stopPort>也請務必要加,否則jetty:stop會無法正常使用。
第三步:在Eclipse加上Run/Debug Configurations,
(1)Jetty Run:
(1)Jetty Run:
(2)Jetty Stop:
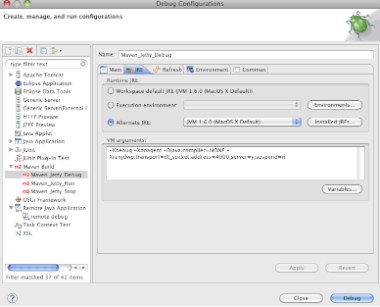
(3)Jetty Debug:
 先同於Jetty Run一樣
在"Main" Tab中
Base directory中輸入${project_loc}
Goals輸入jetty:run
然後在"JRE" Tab中
VM arguments:輸入
-Xdebug -Xnoagent -Djava.compiler=NONE -Xrunjdwp:transport=dt_socket,address=4000,server=y,suspend=n
其中address=4000,4000是指Remote debug所用的port,只要不被其他Server佔用就好。
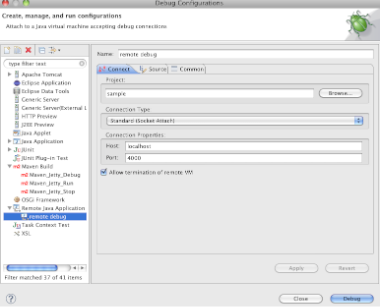
(4)Remote Debug
 加入一個Remote Java Application的設定
在這project就必需指定,不能用變數,主要是為了確認Java Source Code與Remote Application的對應,再來host填localhost,當然不一定要是localhost,也可以是其他IP,但是上列的情形來看一定是localhost,Port則是要同於上列(3)所指定的Port。
這樣一來,除了可以不離開Eclipse而啟動關閉Jetty外,也可以利用Remote Debug來做Debug的操作,雖然不能同於Server Adapter一樣方便,但只要會這方法,之後遇到其他Server也不用擔心。
ps;m2eclipse 0.10在設定Maven Build時有點問題,當你要輸入Base directory時請確認你的滑鼠是點在 Package Explorer中的某一個Project名稱而不是Project下某一檔案,否則會警告Base directory設定有誤。


1 則留言:
RunJettyRun 這隻Eclipse plug-in nightly build 有支援jetty7了。 ;)
官方板應該這個月底會推出正式的支持。
張貼留言